Installing a new rainfall shower head can elevate your shower experience to new heights, making it feel like a luxurious getaway in the comfort of your bathroom.
But before you embark on this upgrade, you may wonder, are rainfall shower heads challenging to install?
Fear not! In this article, we will break down the installation process and dispel any doubts, proving that transforming your ordinary shower into a heavenly rainfall experience is easier than you think.
Table of Contents
What is a rainfall shower head?
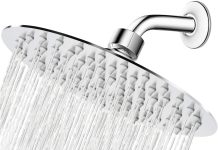
A rainfall shower head, also known as a rain shower head, is a type of shower fixture designed to mimic the feeling of standing in the rain. It is more prominent than traditional shower heads and is often mounted on the ceiling or a high wall to create the effect of water falling from above. Rainfall shower heads are known for providing a luxurious and relaxing shower experience.
Definition
A rainfall shower head is a fixture that simulates standing under a gentle rain shower. It is typically more prominent and has a wide coverage area, allowing water to flow like raindrops from above. The shower head’s design and size help create a soothing and relaxing shower experience.
Design
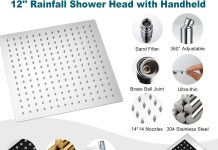
Rainfall shower heads come in various designs to suit different bathroom styles and preferences. They are typically larger than traditional shower heads, ranging from 8 inches to as large as 16 inches in diameter. The larger size allows for a more comprehensive coverage area, providing a more immersive shower experience.
These shower heads are often designed to be mounted on the ceiling or a high wall, allowing water to flow from above, simulating the feeling of standing in the rain. Some models also offer adjustable settings, allowing users to customize the intensity and pattern of the water flow.
Benefits
A rainfall shower head offers several benefits that enhance the overall shower experience. One of the main advantages is the comprehensive coverage area, which provides a gentle and even flow of water that covers more of the body, making it easier to rinse off shampoo and soap.
The rainfall effect created by these shower heads also promotes relaxation and stress relief. The gentle cascade of water can help to create a soothing ambiance, making it feel like a mini escape to a spa-like environment. This can be particularly beneficial for individuals looking to unwind after a long day or those seeking a tranquil start to their day.
Furthermore, rainfall shower heads can add an aesthetic appeal to the bathroom. With their sleek and modern designs, they can elevate the overall look and feel of the shower space, transforming it into a luxurious retreat.
Factors to Consider before Installation
Several factors must be considered before installing a rainfall shower head to ensure a successful installation.
Existing shower setup
The existing shower setup is crucial in determining the feasibility of installing a rainfall shower head. It is essential to assess whether the current plumbing is suitable for installing a ceiling or high wall-mounted shower head. If the plumbing does not support such an installation, alternative options, such as a wall-mounted rainfall shower head, may need to be considered.
Water pressure
Another essential factor to consider is the water pressure in your home. Rainfall shower heads typically require a higher water pressure to provide an optimal shower experience. It is recommended to check the water pressure in your home and ensure that it meets the minimum requirements for a rainfall shower head. If the water pressure is low, it may be necessary to install a booster pump to improve the water flow.
Ceiling height
The ceiling height is a critical factor for ceiling-mounted rainfall shower heads. Proper clearance should be ensured to prevent any discomfort while showering. Ideally, the distance between the top of the shower head and the tallest person’s head should be at least 12 inches to avoid any potential for head injuries.
Installation space
Lastly, the available installation space should be taken into account. Rainfall shower heads require more space than traditional ones due to their larger size. Ensuring enough room to accommodate the shower head and allowing easy access during installation and maintenance is essential.
Tools and Materials Required
To successfully install a rainfall shower head, the following tools and materials will be needed:
Rainfall shower head
The installation’s centerpiece, a rainfall shower head, will be required. Choosing a shower head that suits your preferences in design, size, and water flow is essential.
Shower arm and flange
A shower arm and flange are necessary components for ceiling-mounted rainfall shower heads. These pieces connect the shower head to the plumbing and provide stability.
Teflon tape
Teflon tape, also known as plumber’s tape, creates a watertight seal between the shower head and the arm. This helps to prevent any leaks and ensure a secure connection.
Adjustable wrench
An adjustable wrench is a versatile tool that will be needed to tighten and loosen various connections during the installation process.
Plumber’s tape
The plumber’s tape is used to secure the shower arm to the plumbing, creating a tight and leak-free connection. It helps to ensure the proper functioning of the rainfall shower head.
Bucket or towel
A bucket or towel will be needed to catch any water that may spill during installation. This will help to keep the bathroom clean and prevent any potential damage.
Step ladder
A step ladder or similar tool will be required to access the ceiling or high wall where the rainfall shower head will be installed. Choosing a suitable height and stability ladder is essential for safe and easy installation.
Step-by-Step Installation Guide
Installing a rainfall shower head may seem intimidating initially, but it can be a relatively straightforward process if the necessary steps are followed. Here is a step-by-step guide on how to install a rainfall shower head:
Turn off the water supply
Before starting the installation, it is essential to turn off the water supply to the shower. This can usually be done by closing the water valves located near the shower or by shutting off the main water supply if necessary. It is essential to ensure no water flows to avoid any potential leaks or accidents during the installation process.
Remove the existing shower head
Once the water supply is turned off, removing the existing shower head is next. This can usually be done by using an adjustable wrench to unscrew the shower head from the arm. It is vital to hold the shower arm steady while loosening the shower head to prevent any damage to the plumbing.
Apply Teflon tape
After removing the old shower head, it is necessary to apply Teflon tape to the threads of the shower arm. This will help to create a watertight seal when the new shower head is installed. Wrapping the Teflon tape in a clockwise direction is recommended, ensuring that the threads are fully covered.
Install the shower arm
Next, the shower arm needs to be installed. This can usually be done by screwing the shower arm into the wall plumbing clockwise. Tightening the connection using an adjustable wrench is essential to ensure a secure fit without over-tightening and damaging the plumbing.
Attach the flange
Once the shower arm is securely installed, the flange can be attached. The flange is a decorative cover and provides additional stability to the shower arm. It can typically be slid onto the shower arm and secured by tightening a screw or clip.
Attach the rainfall shower head
Finally, it is time to attach the rainfall shower head. This can usually be done by screwing the shower head onto the arm clockwise. It is essential to tighten the connection firmly, but not excessively, to avoid damaging the shower head or causing leaks.
Check for leaks
After installing the rainfall shower head, checking for leaks is crucial. Turn on the water supply and inspect the connections for any signs of water leakage. If any leaks are detected, it may be necessary to disassemble the connections and reapply Teflon tape or tighten them further. It is essential to ensure all connections are secure and watertight before proceeding.
Test the water flow
Once all the connections have been checked and deemed leak-free, it is time to test the water flow. Turn on the shower and assess the water pressure and overall performance of the rainfall shower head. Make any necessary adjustments to the flow or settings to ensure a comfortable and enjoyable shower experience.
Common Challenges and Solutions
While installing a rainfall shower head can be relatively straightforward, some common challenges may arise. Here are a few potential issues and their solutions:
Leaking connections
One common challenge during installation is the occurrence of leaking connections. This can often be attributed to improper sealing or loose connections. To address this issue, it is essential to ensure that Teflon tape is applied correctly and that all connections are tightened securely. If leaks persist, it may be necessary to disassemble the connections and reapply Teflon tape or use a plumber’s tape for better sealing.
Insufficient water pressure
Sometimes, the water pressure may not be sufficient to provide an optimal shower experience with a rainfall shower head. To address this issue, installing a booster pump to increase the water pressure may be necessary. Alternatively, adjusting the water flow at the main water supply or removing any obstructions in the plumbing may help to improve the water pressure.
Height adjustment
Some individuals may encounter challenges adjusting the height of the rainfall shower head to accommodate different users. In such cases, it is recommended to choose a shower arm with an adjustable extension or seek professional assistance to install a flexible shower arm that offers more flexibility in terms of height adjustment.
Compatibility with existing plumbing
Compatibility issues with existing plumbing may arise during the installation process. Ensuring that the chosen rainfall shower head and arm are compatible with the existing plumbing connections and configuration is essential. If compatibility issues persist, consulting a professional plumber for advice or exploring alternative installation options may be necessary.
Additional Tips for Installation
Here are some additional tips to keep in mind during the installation of a rainfall shower head:
Use plumber’s tape on shower arm threads
In addition to Teflon tape, applying the plumber’s tape on the threads of the shower arm can provide an extra layer of sealing and prevent leaks. This is particularly useful if compatibility issues exist between the shower arm and the rainfall shower head.
Apply silicone sealant for better water resistance
Applying a thin bead of silicone sealant around the base of the shower arm and flange can be beneficial to enhance water resistance and prevent any potential leaks. This helps to create a watertight seal and provides additional protection against moisture.
Consider professional installation for complex setups
If you are unsure about the installation process or if your shower setup is more complex, it may be advisable to seek professional assistance. Professional plumbers have the expertise and experience to handle complex installations and ensure a successful and safe outcome.
Regularly clean the shower head for optimal performance
Regular cleaning is essential to maintain optimal performance and prolong the rainfall shower head’s lifespan. Remove any mineral deposits or debris that may accumulate over time by soaking the shower head in a descaling solution or using a soft brush. This will help to keep the shower head functioning at its best and prevent any potential clogging.
Conclusion
Installing a rainfall shower head can be a rewarding experience that enhances the overall showering sensation. By considering factors such as the existing shower setup, water pressure, ceiling height, and installation space, you can ensure a successful installation.
By following a step-by-step guide and addressing common challenges, you can enjoy the benefits of a luxurious and relaxing shower experience.
Remember to use the necessary tools and materials, apply proper sealing techniques, and consider professional help if needed. With a well-installed rainfall shower head, you can transform your bathroom into a blissful oasis of relaxation and rejuvenation.


